共计 4904 个字符,预计需要花费 13 分钟才能阅读完成。
canvas 简介
HTML5 <canvas> 元素用于图形的绘制,通过脚本JavaScript来完成;<canvas> 标签只是容器,必须使用脚本来绘制图形
使用 canvas
使用 canvas 只需要引入 canvas 标签即可
<canvas width="500" height="500">
    您的浏览器不支持 Canvas
</canvas>
常用方法和属性
画直线
- 获取画布
- 获取画布的上下文
- 开始一条路径
- 确定起始点
- 确定结束点
- 着色
- 结束路径
// 获取 canvas 标签
let canvas = document.querySelector('canvas')
// 获取上下文对象
let c = canvas.getContext('2d')
// 开启一条路径
c.beginPath()
// 确定起始点
c.moveTo(100,100)
// 到哪去,确定结束点
c.lineTo(200,200)
// 设置线颜色
c.strokeStyle = 'skyblue'
// 设置线宽
c.lineWidth = 5
// 进行上色
c.stroke()
// 关闭路径
c.closePath()


// beginPath 开启一个路径
// closePath 关闭一个路径
// moveTo(x, y) 定义线条开始坐标
//  lineTo(x, y) 定义线条结束坐标
// strokeStyle 属性设置或返回用于笔触的颜色、渐变或模式
// stroke 绘制一条路径
// lineWidth 设置线宽
getContext('2d')对象是内建的 HTML5 对象,拥有多种绘制路径、矩形、圆形、字符以及添加图像的方法,这里只有 “2d” 这个属性,没有 “3d”
画矩形
recr(x, y, width, height)绘制矩形- x 矩形左三角的 x 坐标
- y 矩形左三角的 y 坐标
- width 矩形的宽度,单位像素
- height 矩形的高度, 单位像素
fillRect(x, y, width, height)绘制实心矩形strokeRect(x, y, width, height)绘制空心矩形
// recr(x, y, width, height) 绘制矩形
let canvas = document.querySelector('canvas')
let c = canvas.getContext('2d')
c.rect(100, 100, 300, 200)
// 填充颜色
c.fillStyle = 'blue'
// 填充 默认黑色
c.fill()
// 描边
c.strokeStyle = 'red'
c.lineWidth = 3
c.stroke()
// fillRect(x, y, width, height) 绘制实心矩形
let canvas = document.querySelector('canvas')
let c = canvas.getContext('2d')
// 填充颜色
c.fillStyle = 'blue'
c.fillRect(100, 100, 300, 200)strokeRect(x, y, width, height) 绘制空心矩形
let canvas = document.querySelector('canvas')
let c = canvas.getContext('2d')
c.strokeStyle = '#bfa'
c.lineWidth = 5
c.strokeRect(300, 50, 100, 50)如果需要描边和填充时,要先填充再描边
清除画布
clearRect(x, y, width,height)清除画布- x 矩形的左上角 x 坐标
- y 矩形的 左上角 y 坐标
- width 矩形的宽度,单位像素
- height 矩形的高度,单位像素
画圆
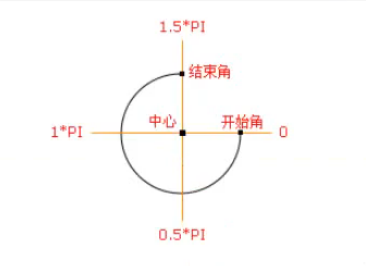
arc() 方法使用一个中心点和半径,为一个画布的当前子路径添加一条弧
arc(x, y, radius, startAngle, endAngle, counterclockwise)- x, y 描述弧的圆形的圆心的坐标
- radius 描述弧的半径
- startAngle, endAngle
沿着圆指定弧的开始点和结束点的一个角度,这个角度用弧度来衡量
沿着 x 轴正半轴的三点钟方向的角度为 0,角度沿着逆时针方而增加
counterclockwise 弧沿着圆周的逆时针方向(true)还是顺时针方向(false)遍历
let circle = document.querySelector('#circle')
var c = circle.getContext('2d')
c.arc(250, 250, 200, 0, Math.PI * 2, false)
c.fillStyle = 'pink'
c.fill()
c.strokeStyle = 'red'
c.lineWidth = 3
c.stroke()

// 上半圆
c.arc(250, 250, 200, 0, Math.PI / 1, true)
// 下半圆
c.arc(250, 250, 200, 0, Math.PI / 1, false)
// 左半圆
c.arc(250, 250, 200, -Math.PI / 2, Math.PI / 2, true)
// 右半圆
c.arc(250, 250, 200, -Math.PI / 2, Math.PI / 2, false)
碰撞检测
var graph4 = document.querySelector('#graph4');

var x = 100,     // x 轴
    y = 100, // y 轴
    r = 30,  // 半径
    w = 500, // 画布宽度
    h = 500; // 画布高度
var xSpeed = 2,  // x 轴的速度
    ySpeed = 3;  // y 轴的速度

// 开启定时器让小球动起来
var timer = setInterval(function () {
    var c = graph4.getContext('2d');

    // 如果 x 轴 减半径 小于等于 0 或者 x 轴 加半径 大于等于 画布宽度
    if (x - r <= 0 || x + r >= w) {
        xSpeed = -xSpeed;
    }
    x += xSpeed;

    if (y - r <= 0 || y + r >= h) {
        ySpeed = -ySpeed;
    }
    y += ySpeed;

    // 清除画布
    c.clearRect(0, 0, w, h);
    // 开启路径
    c.beginPath();
    // 画一个圆
    c.arc(x, y, r, 0, Math.PI * 2, false);
    // 填充颜色
    c.fill();
}, 10);
画文字
fillText(text, x, y[, maxWidth])方法在画布上绘制填色的文本,默认黑色:- text 规定画布上输出的文字
- x 开始绘制文本的 x 坐标位置(相对于画布)
- y 开始绘制文本的 y 坐标位置(相对于画布)
- maxWidth 可选,允许最大文本宽度,单位像素
createLinearGradient()方法创建一个线性的渐变对象,渐变对象可用于填充矩形、圆形、线条、文本等等;使用该对象作为strokeStyle或fillStyle属性的值addColorStop()方法规定不同的颜色,以及在gradient对象中何处定位的颜色context.createLinearGradient(x0, y0, x1, y1)- x0 渐变开始点的 x 坐标
- y0 渐变开始点的 y 坐标
- x1 渐变结束点的 x 坐标
- y1 渐变结束点的 y 坐标
// 创建渐变
var gradient = c.createLinearGradient(0, 0, canvas.width, 0)
gradient.addColorStop('0', 'yellow')
gradient.addColorStop('0.5', 'blue')
gradient.addColorStop('1.0', 'red')
// 应用渐变
c.strokeStyle = gradientfont属性设置返回画布上文本内容的当前字体属性,font属性使用的语法与 CSS font 属性相同
context.font = 'italic small-caps bold 16px arial'
// 规定字体样式:normal、italic、oblique
font-style
// 规定字体变体:normal、small-caps
font-variant
// 规定字体的粗细
font-weight
// 规定字号的行号,单位像素
font-size / line-height
// 规定字体系列
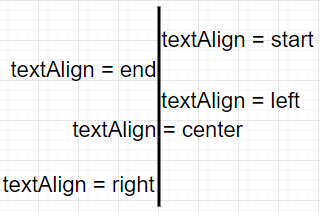
font-familytextAlign属性根据锚点,设置或返回文本内容的当前对齐方式
textBaseline属性设置或返回在绘制文本时的当前文本基线
应用
var canvas = document.querySelector('canvas');
var c = canvas.getContext('2d');
// 设置字体相关样式
c.font = '64px 宋体';
c.fillStyle = 'red';
// 画文字
c.fillText('Joe', 100, 100)
// 空心文字
c.strokeStyle = 'pink';
c.strokeText('Hello', 100, 200)
c.font = '64px 黑体';
// 设置线性渐变
var gradient = c.createLinearGradient(0, 0, canvas.width, 0);
gradient.addColorStop('0', 'red');
gradient.addColorStop('0.5', 'skyblue');
gradient.addColorStop('1.0', 'pink')
// 应用渐变
c.fillStyle = gradient;
c.fillText('渐变实心渐变实心', 0, 300);
c.strokeStyle = gradient;
c.strokeText('渐变空心渐变空心', 0, 400);
绘制图片
drawImage()
在画布上绘制图像、画布或视频,也能够绘制图像的某些部分,以及/或者增加或减少图像的尺寸
// 在画布上定位图像
context.drawImae(img, x, y)
// 在画布上定位图像,并规定图像的宽度和高度
context.drawImage(img, x, y, width, height)
context.drawImage(img, sx, sy, swidth, sheight, x, y, width, height)**- img 规定要使用的图像、画布或视频
- sx 可选、开始剪切的 x 坐标位置
- sy 可选、开始剪切的 y 坐标位置
- swidth 可选、被剪切图像的宽度
- sheight 可选、被剪切图像的高度
- x 在画布上放置图像的 x 坐标位置
- y 在画布上放置图像的 y 坐标位置
- width 可选、要使用的图像宽度(伸展或缩小图像)
- height 可选、要使用的图像高度(伸展或缩小图像)
// 创建图片 img
var img = new Image()
img.src = './1.jpg'

// onload 图片加载成功之后触发
// onerror 图片加载失败后触发
img.onload = function() {
    // 获取当前图片的实际宽高
    console.log(img.width, img.height)
}
getImageData()
返回 ImageData 对象,该对象拷贝了画布指定矩形的像素数据
对于 ImageData 对象中的每个元素,都存在着四方面的信息,即 RGBA 值:
- R 红色(0-255)
- G 绿色(0-255)
- B 蓝色(0-255)
- A alpha 通道(0-255;0 是透明,255是完全可见)
- color/alpha 以数组形式存在,并储存与 ImageData 对象的 data 属性中
getImageData(x, y, width, height)**- x 开始复制左上角位置的 x 坐标
- y 开始复制左上角位置的 y 坐标
- width 将要复制的矩形区域的宽度
- height 将要复制的矩形区域的高度
putImageData()
putImageData(imgData, x, y, dirtyX, dirtyY, dirtyWidth, dirtyHeight)**- imgData 规定要放回画布的 ImageData 对象
- x ImageData 对象左上角的 x 坐标,单位像素
- y ImageData 对象左上角的 y 坐标,单位像素
- dirtyX 可选,水平值(x),单位像素,在画布上放置图像的位置
- dirtyY 可选,水平值(y),单位像素,在画布上放置图像的位置
- dirtyWidth 可选,在画布上绘制图像所使用的宽度
- dirtyHeight 可选,在画布上绘制图像所使用的高度
正文完

