共计 9717 个字符,预计需要花费 25 分钟才能阅读完成。
组件通讯介绍
组件是独立且封闭的单元,默认情况下,只能使用组件自己的数据。在组件化过程中,将一个完整的功能拆分成多个组件,以更好地完成整个应用的功能。而在这个过程中,多个组件之间不可避免的要共享某些数据。为了实现这些功能,就需要打破组件的独立封闭性,让其与外界沟通。这个过程就是组件通讯
组件的 props
- 组件是封闭的,要接收外部数据应该通过
props来实现 props的作用:接收传递给组件的数据- 传递数据:给组件标签添加属性
- 接收数据:函数组件通过参数
props接收数据,类组件通过this.props接收数据
// 函数组件
// 接收数据
function Hello(props) {
    console.log(props)
    return (
        <div>接收到的数据:{props.name}</div>
    )
}
// 传递数据
ReactDOM.render(<Hello name="Joe" age={18} />, document.querySelector('.app'))
// 类组件
// 接收数据 this.props
class Hello extends React.Component {
render() {
return (
<div>接收到的数据:{this.props.age}</div>
)
}
}
// 传递数据
ReactDOM.render(<Hello name="Joe" age={18} />, document.querySelector('.app'))特点
- 可以给组件传递任意类型的数据
props是只读的对象,只能读取属性的值,无法修改该对象- 使用类组件时,如果写了构造函数,应该将
props传递给super(),否则无法在构造函数中获取到props
class Hello extends React.Component {
    constructor(props) {
        // 推荐将 props 传递给父类构造函数
        super(props)
    }
    render() {
        return (
            <div>接收到的数据:{this.props.age}</div>
        )
    }
}
组件通讯的三种方式
父组件 -> 子组件
- 父组件提供要传递的
state数据 - 给子组件标签添加属性,值为
state中的数据 - 子组件中通过
props接收父组件中传递的数据
class Parent extends React.Component {
    state = {
        lastName: '乔'
    }
    render() {
        return (
            <div>
                传递数据给子组件:<Child name={this.state.lastName} />
            </div>
        )
    }
}

// 子组件
class Child extends React.Component {
    render() {
        return (
            <div>子组件接收到的数据:{this.props.name}</div>
        )
    }
}
对 props 进行限制
15.5版本之后被弃用
**15.5版本之后被弃用**
// 创建组件
class Person extends React.Component {
    render() {
        const { name, age, sex } = this.props
        return (
            <ul>
                <li>姓名:{ name }</li>
                <li>性别:{ sex }</li>
                <li>年龄:{ age+1 }</li>
            </ul>
        )
    }
}

// 对 props 进行规则限制 **15.5版本之后被弃用**
Person.propTypes = {
    name: React.PropTypes.string
}

//渲染组件
ReactDOM.render(<Person userName='Tom' sex="女" age={18} />, document.querySelector('.app'))
使用 prop-types
// 创建组件
class Person extends React.Component {
    render() {
        const { name, age, sex } = this.props
        return (
            <ul>
                <li>姓名:{ name }</li>
                <li>性别:{ sex }</li>
                <li>年龄:{ age+1 }</li>
            </ul>
        )
    }
}

// 对 props 进行规则限制
Person.propTypes = {
    name: PropTypes.string.isRequired
    sex: PropTypes.string
    age: PropTypes.number
}
// 默认值
Person.defaultProps = {
      sex: '男'
}

//渲染组件
ReactDOM.render(<Person userName='Tom' sex="女" age={18} />, document.querySelector('.app')
// 简写
// 创建组件
class Person extends React.Component {
// 对 props 进行规则限制
static propTypes = {
name: PropTypes.string.isRequired
sex: PropTypes.string
age: PropTypes.number
}
// 默认值
static defaultProps = {
sex: '男'
}
render() {
const { name, age, sex } = this.props
return (
<ul>
<li>姓名:{ name }</li>
<li>性别:{ sex }</li>
<li>年龄:{ age+1 }</li>
</ul>
)
}
}
//渲染组件
ReactDOM.render(<Person userName='Tom' sex="女" age={18} />, document.querySelector('.app')`props 是只读的
子组件 -> 父组件
思路:利用回调函数,父组件提供回调,子组件调用,将要传递的数据作为回调函数的参数
- 父组件提供一个回调函数(用于接收数据)
- 将该函数作为属性的值,传递给子组件
- 子组件提供
props调用回调函数 - 将组件的数据作为参数传递给回调函数
class Parent extends React.Component {
    getChildMsg = (msg) => {
        console.log('接收到子组件数据', msg)
    }
    render() {
        return (
            <div>
                子组件:<Child getMsg={this.getChildMsg} />
            </div>
        )
    }
}

// 子组件
class Child extends React.Component {
    state = {
        childMsg: 'React'
    }
    handleClick = () => {
        // 子组件调用父组件中传递过来的回调函数
        this.props.getMsg(this.state.childMsg)
    }
    render() {
        return (
            <button onClick={this.handleClick}>点击把数据传递给父组件</button>
        )
    }
}
注意回调函数中
this指向问题
兄弟组件
- 状态提升
- 将共享状态提升到最近的公共父组件中,由公共父组件管理这个状态
- 公共父组件职责:1.提供共享状态、2.提供操作共享状态的方法
- 要通讯的子组件只需要通过
props接收状态或操作状态的方法
class Counter extends React.Component {
    state = {
        count: 0
    }
    addCount = () => {
        this.setState({
            count: this.state.count + 1
        })
    }
    render () {
        return (
            <div>
                <Child1 count={this.state.count} />
                <Child2 addCount={this.addCount} />
            </div>
        )
    }
}
class Child1 extends React.Component {
    render () {
        return (
            <h1>计数器:{this.props.count}</h1>
        )
    }
}
class Child2 extends React.Component {
    render () {
        return (
            <button onClick={this.props.addCount}>+1</button>
        )
    }
}
ReactDOM.render(<Counter />, document.querySelector('.app'))
Context 基本使用
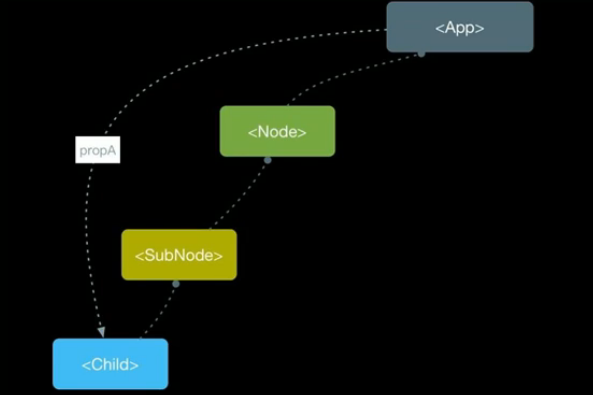
思考:App 组件要传递数据给 Child 组件,该如何处理?
使用 props 一层层组件往下传递(繁琐)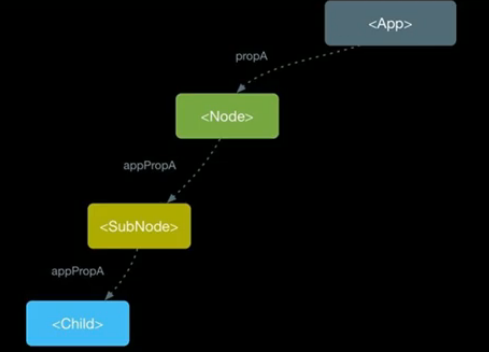
- 使用
Context可以更好的跨组件传递数据(比如:主题、语言等)
使用步骤
- 调用
React.createContext()创建Provider(提供数据)和Consumer(消费数据)两个组件
const { Provider, Consumer } = React.createContext()- 使用
Provider组件作为父节点
<Provider>
    <div className="App">
        <Child1 />
    </div>
</Provider>- 设置
value属性,表示要传递的数据
<Provider value="Joe">
    <div className="App">
        <Child1 />
    </div>
</Provider>- 调用
Consumer组件接收数据
<Consumer>
    { data => <span>data 参数表示接收到的数据 --- { data }</span> }
</Consumer>
props 深入
children 属性
- 表示组件标签的子节点,当组件标签有子节点时,props 就会有该属性
- children 属性与普通的 props 用于,值可以是任意值(文本、React元素、组件、甚至是函数)
function Hello(props) {
    return (
        <div>组件的子节点:{ props.children }</div>
    )
}
ReactDOM.render(<Hello>我是子节点</Hello>, document.querySelector('.app'))
props 校验
- 对于组件来说,props 是外来的,无法保证组件使用者传入什么格式的数据
- 如果传入的数据格式不对,可能会导致组件内部报错
- 关键问题:组件的使用者不知道明确的错误原因
- props校验:允许在创建组件的时候,就指定 props 的类型、格式等
- 作用:捕获使用组件时因为 props 导致的错误,给出明确的错误提示,增加组件的健壮性
App.propTypes = {
    users: PropTypes.Object
}
使用步骤
- 安装包 prop-types
npm i prop-types
#or
yarn add prop-types- 导入 prop-types
import PropTypes from 'prop-types'- 使用
组件名.propTypes = { }来给组件的 props 添加校验规则 - 校验规则通过
PropTyeps对象来指定
import PropTypes from 'prop-types'
function App(props) {
    return (
        <h1>Hi, { props.colors }</h1>
    )
}
App.propTyeps = {
    // 规定 colors 顺序为 array 类型
    // 如果类型不对,则报出明确错误,便于分析错误原因
    colors: PropTypes.array
}
props 校验约束规则
- 常见类型:
array、bool、func、number、object、string - React 元素类型:
element - 必填项:
isRequired - 特定结构的对象:
shape({ })
App.propTypes = {
// 常见类型
optionalFunc: PropTypes.func,
// 必选
requiredFunc: PropTypes.func.isRequired,
// 特定结构的对象
optionalObjectWithShape: PropTypes.shape({
    color: PropTypes.string,
    fontSize: PropTypes.number
})
}
props 默认值
- 场景:分页组件 -> 每页显示条数
- 作用:给 props 设置默认值,在未传入 props 时生效
function App(props) {
    return (
        <div>
            此处展示 props 的默认值:{ props.pageSize }
        </div>
    )
}
// 设置默认值
App.defaultProps = {
    pageSize: 10
}
// 不传入 pageSize 属性
ReactDOM.render(<App />, document.querySelector('.app'))
组件的生命周期
- 组件从被创建到挂载到页面中允许,再到组件不用时卸载的过程
- 生命周期的每个阶段总是伴随着一些方法调用,这些方法就是生命周期的钩子函数
- 钩子函数的作用:未开发人员在不同阶段操作组件提供了时机
- 只有类组件才有生命周期
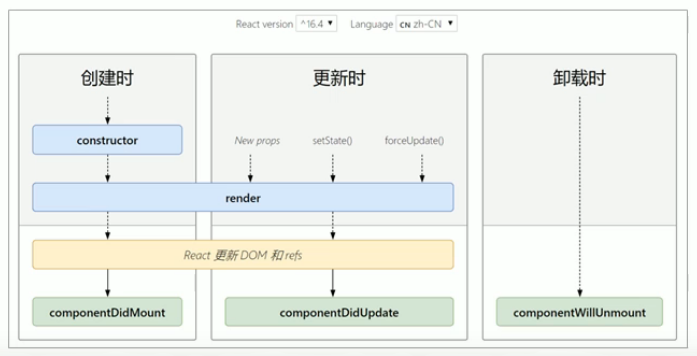
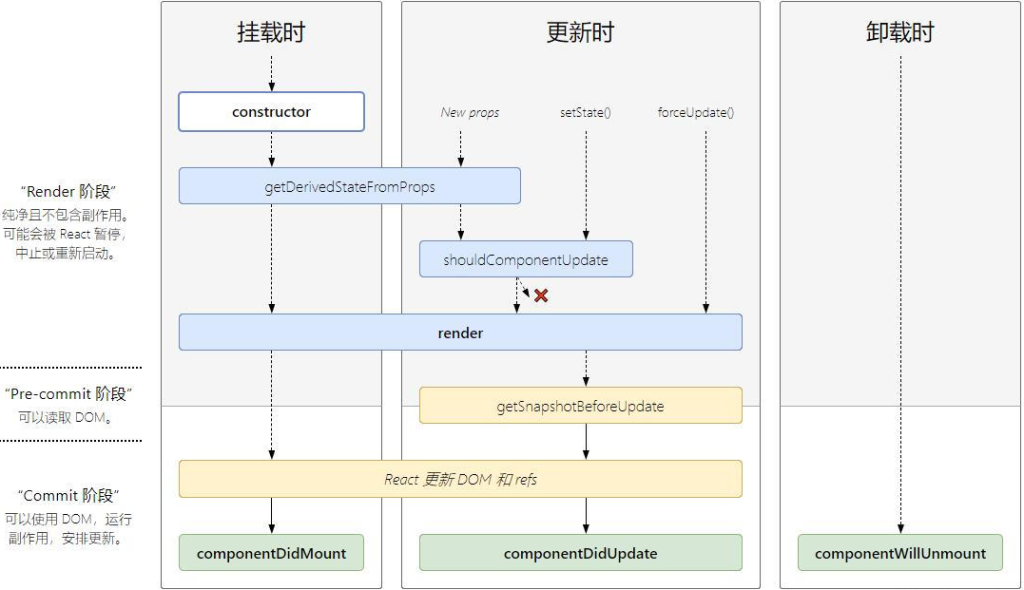
- 组件从创建到死亡它会经历一些特定的阶段。
- React组件中包含一系列勾子函数(生命周期回调函数), 会在特定的时刻调用。
- 我们在定义组件时,会在特定的生命周期回调函数中,做特定的工作。
生命周期三个阶段(旧)
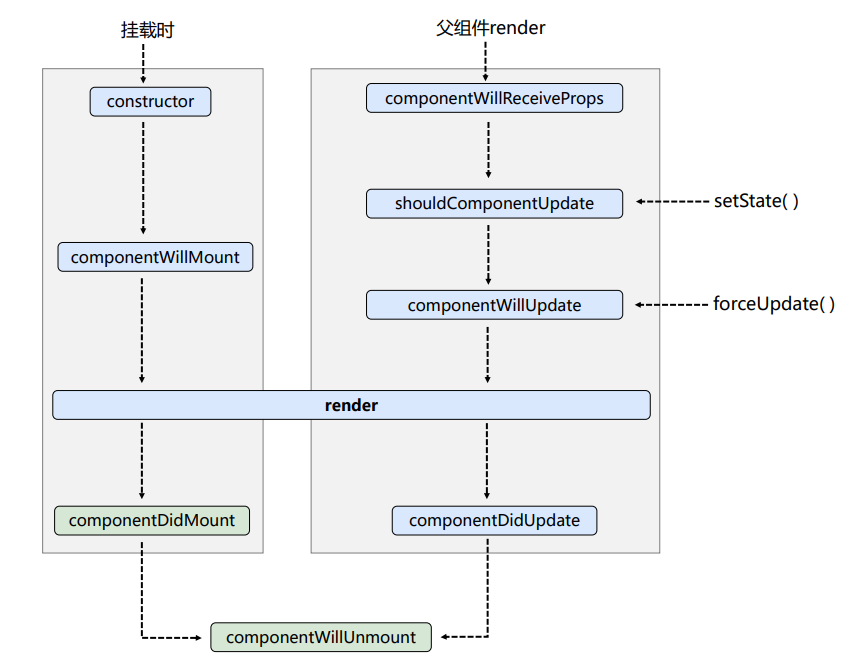
一、初始化阶段: 由 ReactDOM.render() 触发—初次渲染
constructor()componentWillMount()render()componentDidMount()==> 常用 初始化 | 订阅消息
二、更新阶段: 由组件内部 this.setSate() 或父组件重新render触发
shouldComponentUpdate()componentWillUpdate()render()==> 必须componentDidUpdate()
三、卸载组件: 由 ReactDOM.unmountComponentAtNode() 触发
componentWillUnmount()==> 常用 收尾 | 取消订阅
生命周期三个阶段(新)
一、初始化阶段: 由 ReactDOM.render() 触发—初次渲染
constructor()getDerivedStateFromPropsrender()componentDidMount()==> 常用 初始化
二、更新阶段: 由组件内部 this.setSate() 或父组件重新render触发
getDerivedStateFromPropsshouldComponentUpdate()render()getSnapshotBeforeUpdate==> 在更新之前获取快照
(5.componentDidUpdate()
三、卸载组件: 由 ReactDOM.unmountComponentAtNode() 触发
componentWillUnmount()==> 常用 收尾
重要的勾子
render:初始化渲染或更新渲染调用componentDidMount:开启监听, 发送ajax请求componentWillUnmount:做一些收尾工作, 如: 清理定时器
即将废弃的勾子
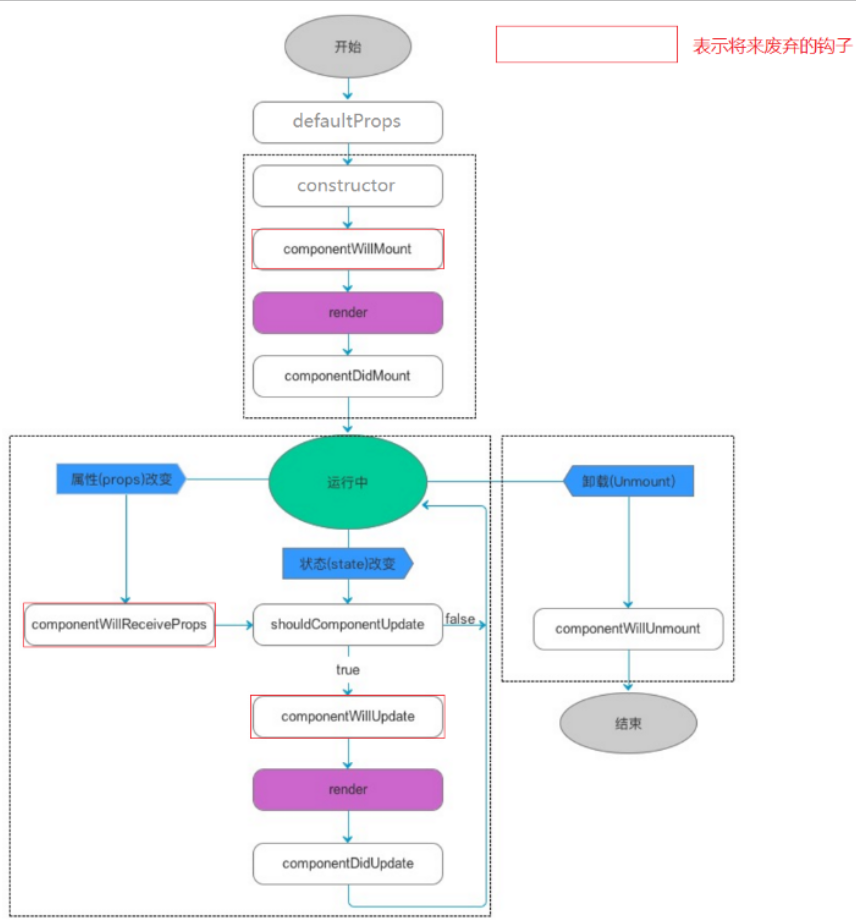
componentWillMountcomponentWillReceivePropscomponentWillUpdate
现在使用会出现警告,下一个大版本需要加上
UNSAFE_前缀才能使用,以后可能会被彻底废弃,不建议使用。
生命周期三个阶段
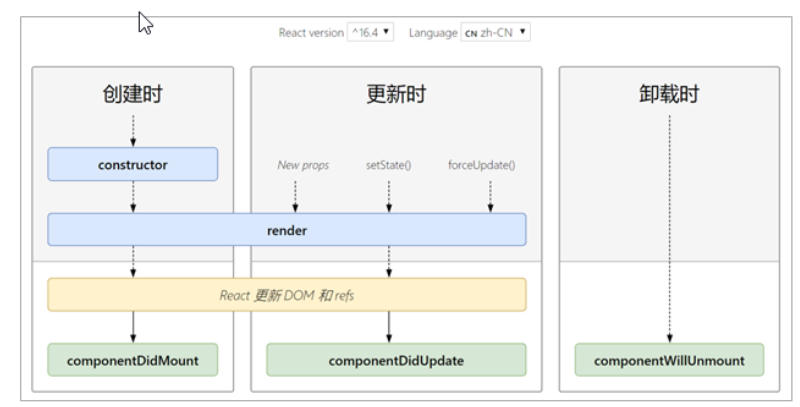
- 创建时(挂载阶段)
- 执行时机:组件创建时(页面加载时)
- 执行顺序:


- 更新时(更新阶段)
- 执行时机:1.
setState()、2.forceUpdate()、3.足迹接收到新的props - 以上三者任意一种变化,组件就会重新渲染
- 执行顺序:

- 执行时机:1.

- 卸载时(卸载阶段)
- 执行时机:组件从页面消失

- 执行时机:组件从页面消失
其他钩子函数
旧版生命周期钩子函数
React 16.4生命周期钩子函数
render-props和高阶组件
React 组件复用概述
- 如果两个组件中部分功能相似或相同。如何处理
- 处理方式:复用相似的功能(联想函数封装)
- 复用什么:1.
state、2.操作state的方法(组件状态逻辑) - 两种方式:1.
render props模式、2.高阶组件(HOC)
这两种模式不是新的 API,而是利用 React 自身特定的编码技巧,烟花而成的固定模式(写法)
render props 模式
- 思路:将要复用的 state 和操作 state 的方法封装到一个组件中
- 问题1:如何拿到该组件中复用的 state?
- 在使用组件时,添加一个值为函数的 prop,通过函数参数来获取(需要组件内部实现)
- 问题2:如何渲染任意的 UI
- 使用函数的返回值作为要渲染的 UI 内容(需要组件内部实现)
<Mouse render={ (mouse) => {} } />

<Mouse render={ (mouse) => {
    <p>鼠标当前位置:{ mouse.x },{ mouse.y }</p>
} } />
步骤
- 创建 Mouse 组件,在组件中提供复用的状态逻辑代码(1.状态、2.操作状态的方法)
- 将要复用的状态作为
props.render(state)方法的参数,暴露到组件外部 - 使用
props.render()的返回值作为渲染的内容
// Mouse 组件
class Mouse extends React.Component {
    state = {
        // 鼠标位置
        x: 0,
        y: 0
    }

    handleMouseMove = (e) => {
        this.setState({
            x: e.clientX,
            y: e.clientY
        })
    }
    // 监听鼠标移动事件
    componentDidMount () {
        window.addEventListener('mousemove', this.handleMouseMove)
    }

    render () {
        return this.props.render(this.state)
    }
}

// 使用 Mouse 组件
<Mouse render={ (mouse) => <p>鼠标当前位置:{ mouse.x },{ mouse.y }</p> }/>- 并不是该模式叫做 render props 就必须使用名为 render 的 prop,实际上可以使用任意名称的 prop
- 把 prop 是一个函数并且告诉组件要渲染什么内容的技术叫做:render props 模式
- 推荐:使用
children代替 render 属性
// Mouse 组件
class Mouse extends React.Component {
    state = {
        // 鼠标位置
        x: 0,
        y: 0
    }

    handleMouseMove = (e) => {
        this.setState({
            x: e.clientX,
            y: e.clientY
        })
    }
    // 监听鼠标移动事件
    componentDidMount () {
        window.addEventListener('mousemove', this.handleMouseMove)
    }

    render () {
        return this.props.children(this.state)
    }
}

// 使用 Mouse 组件
<Mouse>
    { ({ x, y }) => <p>鼠标当前位置:{ x },{ y }</p> }
</Mouse>


// Context 中的用法:
<Consumer>
    { data => <span>data 参数表示接收到的数据 --- { data }</span> }
</Consumer>
代码优化
- 给 render props 模式添加 props 校验
Mouse.propTypes = {
    // chidlren 属性是一个函数并且是必填项
    chidlren: PropTypes.func.isRequired
}- 应该在组件卸载时解除 mousemove 事件绑定
componentWillUnmount() {
    window.removeEventListener('mousemove', this.handdleMouseMove)
}
高阶组件

思路分析
- 高阶组件(HOC,Higher-OrderComponent)是一个函数,接收要包装的组件,返回增强后的组件
- 高阶组件内部创建一个类组件,在这个类组件中提供复用的状态逻辑代码,通过 prop 将复用的状态传递给被包装组件
WrappedComponent
const EnhancedComponent = withHOC(WrappedComponent)

// 高阶组件内部创建的类组件
class Mouse extends React.Component {
    // ...省略复用的逻辑代码
    render() {
        return <WrappedComponent { ...this.state } />
    }
}
使用步骤
- 创建一个函数,名称约定以** with 开头**
- 指定函数参数,参数应该以大写字母开头(作为要渲染的组件)
- 在函数内部创建一个类组件,提供复用的状态逻辑代码,并返回
- 在该组件中,渲染参数组件,同时将状态通过 prop 传递给参数组件
- 调用该高阶组件,传入增强的组件,通过返回值拿到增强后的组件,并将其渲染到页面中
// 创建高阶组件
function witMouse(WrappedComponent) {
    // 该组件提供复用的状态逻辑
    class Mouse extends ReactComponent {
        // 鼠标状态
        state = {
            x: 0,
            y: 0
        }
    }

    handleMouseMove = (e) => {
        this.setState({
            x: e.clientX,
            y: e.clientY,
        })
    }
    // 控制鼠标状态的逻辑
    componentDidMouse() {
        window.addEventListener('mousemove', this.handleMouseMove)
    }

    // 组件销毁时解绑 mousemove 事件
    componeneDidUnmounted() {
        window.removeEventListener('mousemove', this.handleMouseMove)
    }

    render() {
        return <WrappedComponent { ...this.state } />
    }

    return Mouse
}

const Position = (props) => (
    <p>
        鼠标当前位置:x: { props.x }, y: { props.y }
    </p>
)

const MousePosition = witMouse(Position)
设置 displayName
- displayName 的作用:用于设置调试信息(React Developer Tools)
- 使用高阶组件存在的问题:得到的两个组件名称相同
- 原因:默认情况下,React 使用组件名称作为 displayName
- 解决方式:为告诫组件设置 displayName 便于调试时区分不同的组件
// 创建高阶组件
function witMouse(WrappedComponent) {
    // 该组件提供复用的状态逻辑
    class Mouse extends ReactComponent {
        // 鼠标状态
        state = {
            x: 0,
            y: 0
        }
    }

    handleMouseMove = (e) => {
        this.setState({
            x: e.clientX,
            y: e.clientY,
        })
    }
    // 控制鼠标状态的逻辑
    componentDidMouse() {
        window.addEventListener('mousemove', this.handleMouseMove)
    }

    // 组件销毁时解绑 mousemove 事件
    componeneDidUnmounted() {
        window.removeEventListener('mousemove', this.handleMouseMove)
    }

    render() {
        return <WrappedComponent { ...this.state } />
    }

    // 设置组件 displayName
    Mouse.displayName = `WitMouse${getDisplayName(WrappedComponent)}`

    return Mouse
}

function getDisplayName(WrappedComponent) {
    return WrappedComponent.display || WrappedComponent.name || 'Component'
}
传递 props
- 问题:props 丢失
- 原因:高阶组件没有往下传递 props
- 经济复苏:渲染 WrappedComponent 时,将 state 和 this.props 一起传递给组件
<WrappedComponent { ...this.state } { ...this.props } />正文完

