共计 29735 个字符,预计需要花费 75 分钟才能阅读完成。
框架环境和基本使用
Umi 是蚂蚁金服的底层前端框架, 是可扩展的企业级前端应用框架, 内置了路由、构建、部署、测试, 包含组件打包、文档工具、请求库、hooks 库、数据流等 , 通过框架的方式简化 React 开发
知识结构图
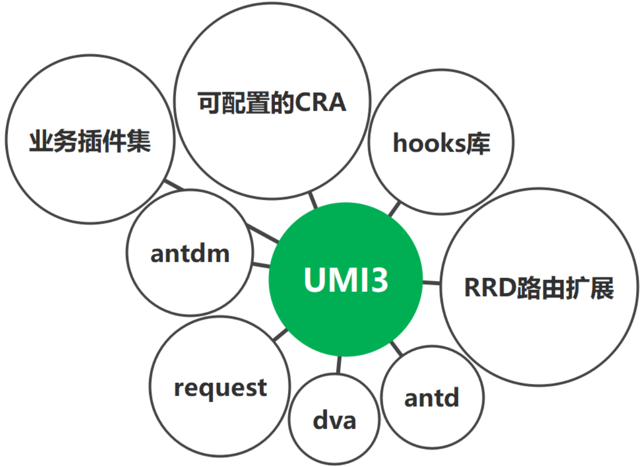
官网:https://v3.umijs.org/zh-CN
环境准备,快速上手
准备工作:由于国内网络和前端的特殊性,在安装依赖等方面可能会失败或导致无法启动,浪费大量的时间,推荐使用 yarn 作为包管理器,并且使用国内镜像,推荐 yrm 这个工具管理 yarn 镜像
# 安装
npm install -g yrm

# 查看 yarn 镜像源
yrm ls

# 切换源
yrm use taobao
项目初始化
新建一个空目录,在空目录里面执行命令
# 使用 yarn 安装 umi 环境
yarn create @umijs/umi-app

# 安装依赖
cd 目录
yarn

# 启动项目
yarn start
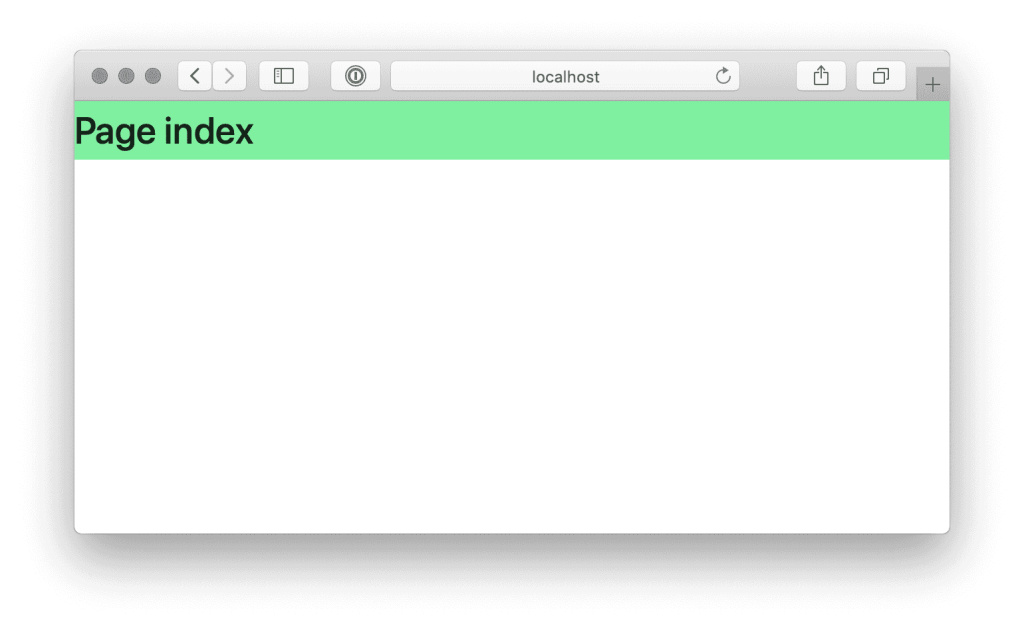
在浏览器里打开 http://localhost:8000,能看到以下界面:
目录结构
├── dist                        // 默认的 build 输出目录
├── mock                        // mock 文件所在目录,基于 express
├── config
    ├── config.js               // umi 配置,同 .umirc.js,二选一
├── public                      // 变通的数据资源目录和一些无需打包的资源
└── src                         // 源码目录
    ├── layouts/index.js        // 全局布局
    ├── models                  // 数据流
    ├── wrappers                // 权限管理
    ├── pages                   // 页面目录,里面的文件即路由
        ├── .umi                // dev 临时目录,需添加到 .gitignore
        ├── .umi-production     // build 临时目录,会自动删除
        ├── document.ejs        // HTML 模板
        ├── 404.js              // 404 页面
        ├── page1.js            // 页面 1,任意命名,导出 react 组件
        ├── page1.test.js       // 测试用例文件
        └── page2               // 页面 2,内部可含有
    ├── global.css              // 约定的全局样式文件,自动引入,也可以用 global.less
    ├── global.js               // 可以在这里加入 polyfill
    ├── app.js                  // 运行时配置文件
├── .umirc.js                   // umi 配置,同 config/config.js,二选一
├── .env                        // 环境变量
└── package.json
构建时配置

构建时是对开发环境配置,如果项目的配置不复杂,推荐在 .umirc.ts 中写配置; 如果项目的配置比较复杂,可以将配置写在config/config.ts 中,并把配置的一部分拆分出去,现实往往是复杂的所以推荐 config/config,两种配置方式二选一,.umirc.ts 优先级更高,采用 config 配置时,一般删除 .umirc.ts
import { defineConfig } from 'umi';
import proxy from './proxy';
import routes from './routes';
import theme from './theme'

export default defineConfig({
  nodeModulesTransform: { // node_modules 目录下依赖文件的编译方式
    type: 'none', // all 慢 兼容性好 none 快 兼容性一般
  },
  mfsu: {}, // 打包提速
  fastRefresh: {}, // 快速刷新 可以保持组件状态,同时编辑提供即时反馈
  title:'UMI3', // 配置标题。
  mountElementId: 'app', // 指定 react app 渲染到的 HTML 元素 id
  favicon: '/favicon.ico', // 使用本地的图片,图片请放到 public 目录

  routes: routes,

  proxy:proxy, // 配置反向代理

  // 启用按需加载
  dynamicImport: {
    loading: '@/components/loading', // 按需加载时指定的 loading 组件
  },

  theme, // 配置主题,实际上是配 less 变量
  devServer: {
    port: 8666, // .env 里面权限更高一些
    // https:true, // 启用 https 安全访问,于对应协议服务器通讯
  }
})
模板约定
umi 内部默认没有 html,会自行生成,如果需要修改, 新建 src/pages/document.ejs
<!doctype html>
<html>
<head>
  <meta charset="utf-8" />
  <meta name="viewport" content="width=device-width">
  <title>Your App</title>
</head>
<body>
  <div id="app"></div>
</body>
</html>
antd, antd-mobile 使用
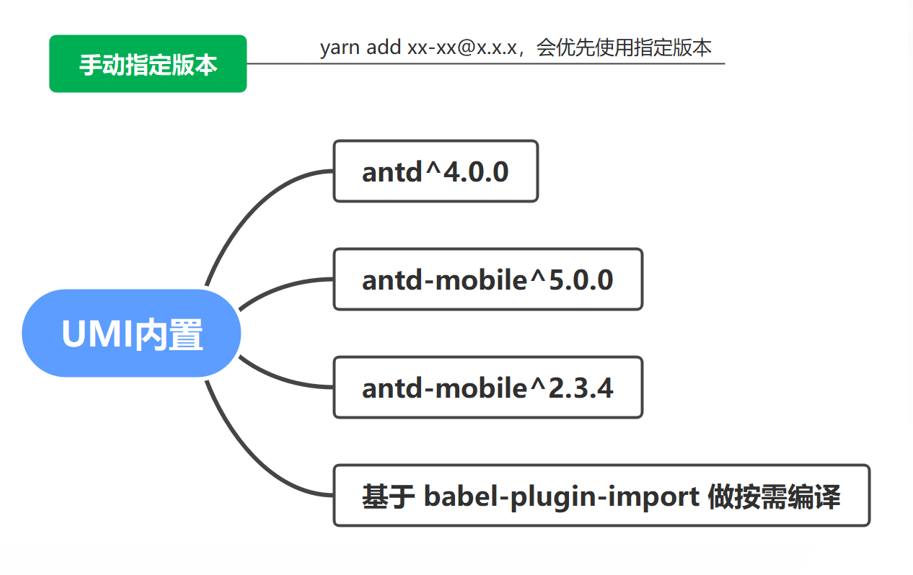
umi 已整合 antd 组件库,可通过 import {Xxx} from 'antd' 使用
使用指定版本组件库,yarn add xx-xx@x.x.x 后,会优先使用指定版本
antd 主题设定
找到 config/theme
export default {
  "@primary-color": "pink" // antd 全局样式 copy 过来统一修改
};
antd 样式变量:https://ant.design/docs/react/customize-theme-cn
antd-mobile
更新
@umijs/preset-react到最新版本
umi 已整合antd-mobile组件库,可通过import {Xxx} from 'antd-mobile'使用 v5 版本,可通过import {Xxx} from 'antd-mobile-v2'使用 v2 版本,使用指定版本组件库,yarn add xx-xx@x.x.x后,会优先使用指定版本,推荐使用 v5
使用 v5 版本报错,找不到被使用的组件时尝试:
- 删除
.umi - 更新
@umijs/preset-react包 - 关闭
mfsu - 重启
antd-mobile v5 主题修改
/* src/global.less */
:root:root {
  --adm-color-primary: hotpink; // antd-mobile 全局样式 copy 过来统一修改
}
antd-moblid 提供的全局变量:https://mobile.ant.design/zh/guide/theming/
antd-mobile v2 主题修改和 antd 一样
图片和其他资源引入

项目中使用图片有两种方式:
- 先把图片传到 cdn,然后在 JS 和 CSS 中使用图片的绝对路径
- 把图片放在项目里,然后在 JS 和 CSS 中通过相对路径的方式使用
前者趋向数据图片,后者趋向写死的图片,通过相对路径引入图片的时候,如果图片小于 10K,会被编译为 Base64 嵌入网页
// src/pages/index.tsx
import styles from './index.less';
import { Button } from 'antd';
import { Button as V2Button } from 'antd-mobile-v2';
import { Button as V5Button } from 'antd-mobile';

import user from '../assets/images/userBj.png'

export default function IndexPage() {
  return (
    <div>
      <h1 className={styles.title}>Page index</h1>
      <Button type='primary'>Button</Button>

      <V2Button type='primary' size='small'>V2Button</V2Button>

      <V5Button color='primary'>Purple</V5Button>

      <div>
        <h3>写死</h3>
        <img src={user} />
        <img src={require('../assets/images/userBj.png')} />

        <h3>动态</h3>
        {/*动态图片 丢到服务器 推荐,或临时指向 public 不推荐*/}
        <img src="/img/bg.jpg" alt="" style={{ width: 100 }} />

        <h3>样式内部使用</h3>
        <div className={styles.test} style={{ height: 100 }}></div>
      </div>
    </div>
  );
}
// src/pages/index.less
.title {
background: rgb(121, 242, 157);
}
.test{
// background: url('../assets/images/bg.jpg');
// 别名效果 在 css 里面指向 src 目录需要使用 ~@
background: url('~@/assets/images/bg.jpg');
// background: url('cdn 链接');
// background: url('/img/bg.jpg');
}组书写风格与页面跳转
Less 变量,混合,嵌套,父选择器
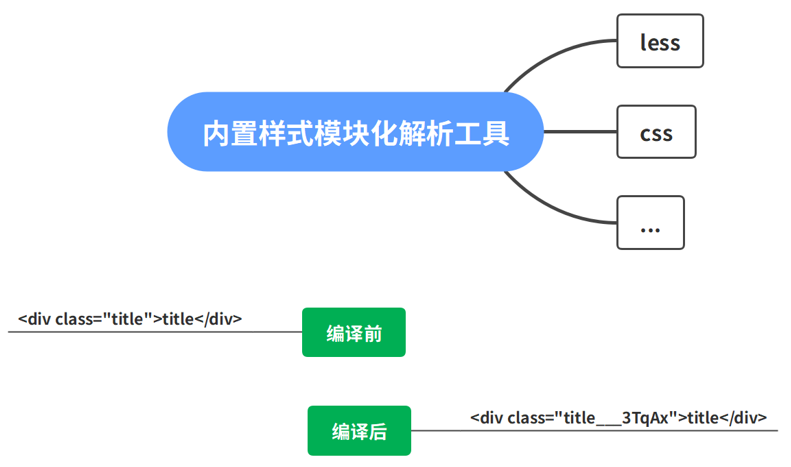
框架 自带了 less,css 及模块化的解析工具 ,推荐模块化使用 lessimport styles from 'xx.less 避免了全局污染 和 选择器复杂
模块化的基本原理很简单,就是对每个类名(非 :global 声明的)按照一定规则进行转换,保证它的唯一性。如果在浏览器里查看这个示例的 dom 结构,你会发现实际渲染出来是这样的:
<div class="title___3TqAx">title</div>类名被自动添加了一个 hash 值,这保证了它的唯一性。
实际开发中简单的样式我们并不推荐写 css,推荐使用模板组件来进行开发,或者直接写行内 css。css 并没有很好的依赖关系,很多项目都有冗余的 css,但是却不敢删除
全局变量
// src/global.less

{/* title 为 global.less 配置的整体样式 */}
<h2 className="title">全局样式</h2>


@import '~antd/es/style/themes/default.less';
// 使用 default 的变量
.myLink {
  color: @primary-color;
  font-size: @font-size-base;
}

<div className='myLink'>测试</div>
局部变量
@width: 100px;
@height: @width - 80px;

.header {
  width: @width;
  height: @height;
  background: pink;
}
混合
.bordered (@topW: 1px, @bottomW: 2px) {
  border-top: dotted @topW black;
  border-bottom: solid @bottomW black;
}

#a1 {
  color: #111;
  .bordered();
}

.a2 {
  color: red;
  .bordered(2px, 4px);
  // border-bottom: solid 5px black; // 覆盖混合
}
嵌套
.nesting {
  color: blue;
  h3 {
    color: coral;
  }
  p {
    color: aqua;
  }
}
:global
/* 定义多个全局样式 */
.bars_right {
  font-weight: bold;
  :global {
    .ant-btn {
      border: 0;
    }
    .title {
      background: #fafafa;
    }
  }
}

<div className={styles.bars_right}>
    <button className={`ant-btn`}>按钮</button>
</div>
hooks + 函数式编写组件
function 组件(){}
const 组件 = (props) = >{

  // 使用 hooks

  // 定义 函数 变量

  return jsx
}
useContext
组件上下文共享,越级传递数据,响应式
// 创建上下文 context.jsx
import {createContext} from 'react'
const AppContext = createContext({})
export default AppContext;

// 祖先组件提供上文 parent.jsx
function 父组件() {
  const [msg, setMsg] = useState('hooks 组件数据')
  return (
      <AppContext.Provider value={{ msg, setMsg }}>
      ....
      <子组件 />
      ...
    </AppContext.Provider>
  )
}


// 后代组件接受下文 child.jsx
import { useContext } from "react";
import AppContext from "../context";

function 后代组件(){
  const {msg,setMsg} = useContext(AppContext);
  return (
    <>
      <div>{msg}</div>
      <button onClick={setMsg}>按钮</button>
    </>
  )
}
useMemo
hooks 出来之后,我们能够使用 function 的形式来创建包含内部 state 的组件。但是,使用 function 的形式,失去 shouldComponentUpdate,我们无法通过判断前后状态来决定是否更新。在函数组件中,react 不再区分 mount 和 update 两个状态,函数组件的每一次调用都会执行其内部的所有逻辑,如下:
export default function Xxx() {

  const [count, setCount] = useState(1);
  const [value, setValue] = useState('');

  function getNum() {
    console.log("getNum");
    return count * 100
  }

  return (
    {/* 组件任何一条数据变化,getNum 函数重复调用 */}
    <div>getNum:{getNum()}</div>
    <button onClick={() => setCount(count + 1)}>+1</button>
    <input value={value} onChange={ev => setValue(ev.target.value)} />
  )
}
那么会带来较大的性能损耗。useMemo 可指定依赖的数据变化才渲染,类似 vue 计算属性,返回缓存后的值数据,可拿去渲染
export default function Xxx() {

  const [count, setCount] = useState(1);
  const [value, setValue] = useState('');

  const getNumMemo = useMemo(() => {
    // 可执行一些没有副作用的业务,比如同步重新计算 count
    return count * 100
  }, [count])

  return (
    {/* 只有 count 数据变化,getNumMemo 函数才会调用 */}
    <div>getNum:{getNumMemo}</div>
    <button onClick={() => setCount(count + 1)}>+1</button>
    <input value={value} onChange={ev => setValue(ev.target.value)} />
  )
}
memo
react 父组件更新未传递给子的数据,子组件也会更新,如下:
// 修改 count 或者 value 时,child 组件都会更新
<button onClick={() => setCount(count + 1)}>+1</button>
<input value={value} onChange={ev => setValue(ev.target.value)} />
<Child count={count} />
memo 可以协助子组件只依赖传递过来的数据变化时才更新
import {memo} from 'react'

function Child({count}){
  const show = () => console.log('child 组件渲染')
  return (
    <>
      <h3>Child2 组件</h3>
      <div>{show()}</div>
      <div>{count}</div>
    </>
  )
}
// memo 修饰当前组件 依赖父的数据变化时,才渲染
export default memo(Child)

// 不包装的情况下,父任意数据更新子都会更新
// export default Child
useCallback
由于组件内的业务函数传递给子组件时,每次都会是新的引用,会导致子组件无故更新,如下:
父组件
// 修改 count 或者 value 时,child 组件都会更新
<button onClick={() => setCount(count + 1)}>+1</button>
<input value={value} onChange={ev => setValue(ev.target.value)} />
<Child updateCount=(()=>console.log('业务')) />
子组件
import {memo} from 'react'
function Child({updateCount}){
  const show = () => console.log('child 组件渲染')
  return (
    <>
      <h3>Child3 组件</h3>
      <div>{show()}</div>
      <button onClick={updateCount}>测</button>
    </>
  )
}
// memo 修饰当前组件 依赖父的数据变化时,才渲染 但依赖父的是个函数时 memo 无效
export default memo(Child)
useCallback 可以将函数缓存起来,节省性能,指定某个被依赖的数据变化才更新函数,子组件配合 memo 实现,如下:
export default () => {

  const updateCount = useCallback(()=>{
    // 业务
  },[])

  return (
     //修改 count 或者 value 时,child 组件都会更新
    <button onClick={() => setCount(count + 1)}>+1</button>
    <input value={value} onChange={ev => setValue(ev.target.value)} />
    <Child updateCount={updateCount} />
  )
}
useLayoutEffect
useLayoutEffect 早于类组件早于 useEffect
挂载时
类 render → 函数 render → useLayoutEffect→ 类 didmount → useEffect
更新时
类 render 渲染 → 函数 render → useLayoutEffect 销毁→ useLayoutEffect 执行→ 类 didUpdate → useEffect 销毁… → useEffect 执行
路由,权限,动态,约定式
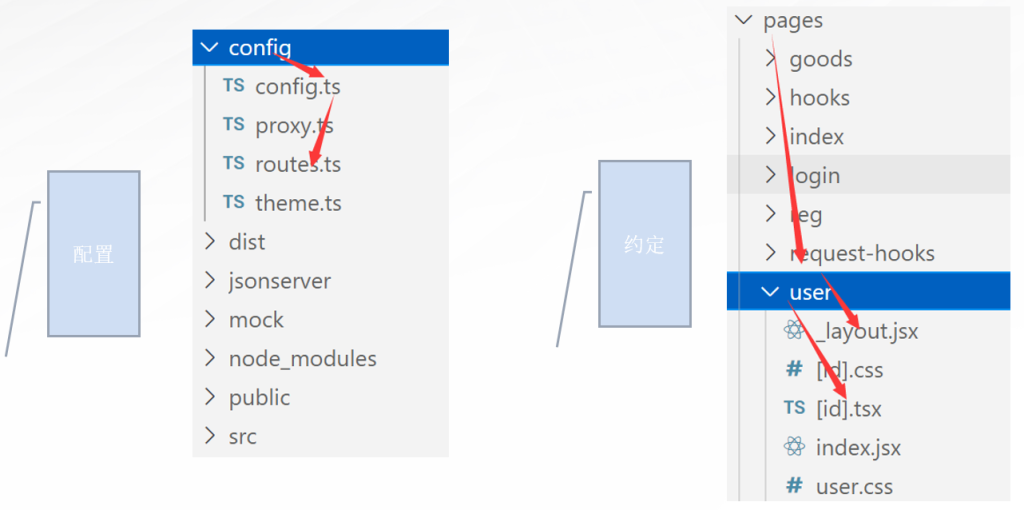
页面地址的跳转都是在浏览器端完成的,不会重新请求服务端获取 html,html 只在应用初始化时加载一次 ,页面由不同的组件构成,页面的切换其实就是不同组件的切换, 只需要在把不同的路由路径和对应的组件关联上 ,实现方式如下两种
- 配置型路由(
在配置文件写入相关配置代码),配置型存在时,约定式失效 - 约定式(
约定文件位置名称与格式无需写代码配置)
约定式是理想型方案,实际开发一般会向现实低头,推荐采用配置型路由
配置 config/config 的 routes 属性,接受数组,一般单独写一个 routes 模块文件如下:
//  config/routes
export default [
  { path: '/less', component: 'less' }, // 不写路径从 src/pages找组件
  { path: '/antd', component: './antd' }, // 当前指向 pages
  { component: '@/pages/404' }, // @ 指向 src
]
export default [
    { path: '/login', component: 'login' },
    { path: '/reg', component: './reg' },

    {
      path: '/',
      component: '@/layouts/layout1',// layout 组件
      routes: [
        { path: '/less', component: 'less' },
        { path: '/antd', component: 'antd' },
        {  path:'/', redirect: '/antd' },
        { component: '@/pages/404' },
      ],
    },

    { component: '@/pages/404' },


][^routes]: 配置子路由,通常在需要为多个路径增加 layout 组件时使用
// layouts/布局组件

// 可引入一些 components 下的公共组件来完成公共布局
import Nav1 from '../../components/nav1'
import styles from './index.less'

const Layout1 = props => {
  return (
    <>
      {props.children}
      <div className={styles['adm-tab-bar']}><Nav1/></div>
    </>
  )
}

export default Layout1;
{ path: '/user', component: 'user',wrappers:['@/wrappers/auth']}, // 路由守卫// wrappers/auth
import { Redirect } from 'umi'
export default (props) => {
if (Math.random() < .5) {
return <div>{props.children}</div>;
} else {
return <Redirect to="/login" />;
}
}多级子路由
{
  path: '/goods',
  component: '@/layouts/layout2', // 展示区
  routes:[
    // { path: '/goods', component: 'goods' },
    // { path:'/goods', redirect: '/goods/2' }, // 这里的
    { path: '/goods/:id?', component: 'goods/goods-detail' }, // 动态可选路由
    { path: '/goods/:id/comment', component: 'goods/comment' }, // 不配 routes,占用当前展示区
    { path: '/goods/:id/comment/:cid', component: 'goods/comment/comment-detail' },
    { component: '@/pages/404' },
  ]
}
页面跳转,参数接收
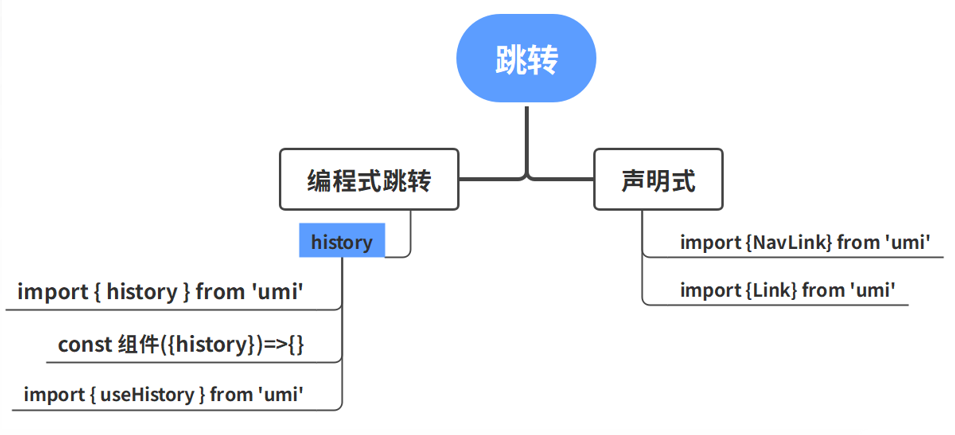
声明式跳转 + 传参
const nav1 = ()=>{
  return (
      <NavLink activeClassName={styles.xx} to="/antd">antd</NavLink>
      <NavLink activeStyle={{color:'#399'}} to="/antd">antd</NavLink>
      <Link to="/antd">antd</Link>
      <Link to={{pathname:'/antd',search:'?a=1',query:{a:1}}}>antd</Link>
  )
}
编程式跳转 + 传参
// history 可以导入或者上下文获取
import { history } from 'umi';
const 组件({history})=>{}

// 跳转到指定路由
history.push('/list');

// 带参数跳转到指定路由
history.push('/list?a=b');
history.push({
  pathname: '/list',
  query: {
    a: 'b',
  },
});

// 跳转到上一个路由
history.go(-1);
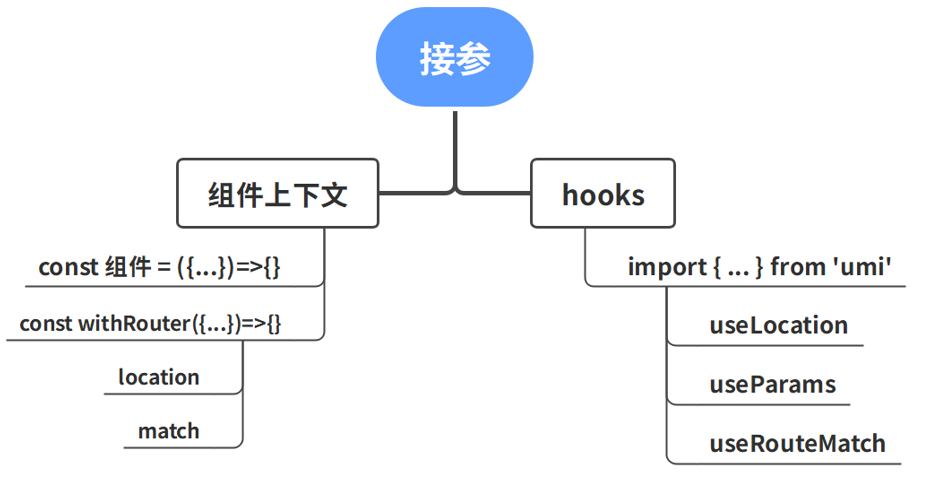
参数接收
// 可以从组件上下文获取
const 组件 = ({location,match})=>{}

// 如果没有上下文可以 withRouter 包装组件
import { withRouter } from 'umi';
const withRouter({location,match})=>{}

// 可以直接使用 umi 的 hooks 获取
import { useLocation,useParams,useRouteMatch} from 'umi';
const 组件 = ()=>{
  const params = useParams();
  params.id | params.cid
  const location = useLocation();
  location.search | location.query
}
相关 API:https://v3.umijs.org/zh-CN/api
数据生成与请求
数据模拟 umi-mock

Mock 数据是前端开发过程中必不可少的一环,是分离前后端开发的关键链路。通过预先跟服务器端约定好的接口,模拟请求数据甚至逻辑,能够让前端开发独立自主,不会被服务端的开发所阻塞
UMI3 里约定 mock 文件夹下的文件或者 page(s) 文件夹下的 _mock 文件即 mock 文件,文件导出接口定义,支持基于 require 动态分析的实时刷新,支持 ES6 语法,以及友好的出错提示。
export default {
  // 支持值为 Object 和 Array
  'GET /api/users': { users: [1, 2] },

  // GET 可省略
  '/api/users/1': { id: 1 },

  // 支持自定义函数,API 参考 express@4,可完成业务
  'POST /api/users/create': (req, res) => {res.end('OK'); },
};当客户端(浏览器)发送请求,如:GET /api/users,那么本地启动的 umi dev 会跟此配置文件匹配请求路径以及方法,如果匹配到了,就会将请求通过配置处理,就可以像样例一样,你可以直接返回数据
Mock.js 辅助生成自然且多条数据
import Mock from 'mockjs';

export default {
  // 使用 mockjs 等三方库
  'GET /api/tags': Mock.mock({
    'list|100': [{ name: '@city', 'value|1-100': 50, 'type|0-2': 1 }],
  }),
};
对于整个系统来说,请求接口是复杂并且繁多的,为了处理大量模拟请求的场景,我们通常把每一个数据模型抽象成一个文件,统一放在 mock 的文件夹中,然后他们会自动被引入。
为了更加真实的模拟网络数据请求,往往需要模拟网络延迟时间,可以通过第三方插件来简化这个问题,如:roadhog-api-doc#delay。
import { delay } from 'roadhog-api-doc'; // 模拟延时

export default delay(
  {
    // 支持值为 Object 和 Array
    '/umi/goods': [
      { id: 1, name: '韭菜' },
      { id: 2, name: '西红柿' },
    ],
  },
  2000,
); // 延时
鉴权
// mock/auth
export default {
  'POST /umi/login': (req, res) => {
    const { username, password } = req.body;
    if (username === 'joe' && password === 'qqqqqq') {
      res.send({
        err: 0,
        msg: '成功',
        currentAuthority: 'user',
      });
    } else if (username === 'admin' && password === 'admin123') {
      res.send({
        err: 0,
        msg: '成功',
        currentAuthority: 'admin',
      });
    } else {
      res.send({
        err: 1,
        msg: '失败',
      });
    }
  },
};
分页
// 查分页
// 指定页数范围内显示全数据,超过只显示两条
'GET /umi/list': (req, res) => {
  const { _page = 1, _limit = 3 } = req.query;

  const totalPage = 3; // 设定总页数
  const lastPageLimit = 2; // 设定尾页条数
  const total = _limit * (totalPage - 1) + lastPageLimit; // 计算总条数

  res.send({
    code: 0,
    data: {
      _page,
      _limit,
      total,
      // 控制 data 键,后面数组的条数
      ...Mock.mock({
        [`data|${_page >= totalPage ? lastPageLimit : _limit}`]: [
          {
            'id|+1': 1,
            create_at: '@date("yyyy-MM-dd HHss")',
            'type_str|1': [
              '中转费明细',
              '调整单明细',
              '代收到付明细',
              '客户运费明细',
              '导入失败记录',
            ],
            name: function () {
              return [
                Mock.mock('@datetime("MMdd")'),
                Mock.mock('@county()'),
                this.operator,
              ].join('-');
            },
            path: 'http://xxx/shop/quotation/导入失败列表.xlsx',
            operator: '@cname',
            'status|1': ['0', '1', '2', '3'],
          },
        ],
      }),
    },
  });
},
增删改
// 增
'POST /umi/list': (req, res) => {
  console.log(req.body);
  res.send(
    Mock.mock({
      'data|1': [
        {
          code: 0,
          data: { ...req.body, a: 2 },
          msg: '成功',
        },
        {
          code: 1,
          msg: '失败',
        },
      ],
    }).data,
  );
},

// 删
'DELETE /umi/list/:id': (req, res) => {
  console.log(req.params.id);
  res.send(
    Mock.mock({
      'data|1': [
        {
          code: 0,
          data: { task_id: '123' },
          msg: '成功',
        },
        {
          code: 1,
          msg: '失败',
        },
      ],
    }).data,
  );
},

// 改
'PATCH /umi/list/:id': (req, res) => {
  console.log(req.body);
  res.send(
    Mock.mock({
      'data|1': [
        {
          code: 0,
          data: { ...req.body },
          msg: '成功',
        },
        {
          code: 1,
          msg: '失败',
        },
      ],
    }).data,
  );
},
数据模拟 json-server
一款第三方模拟服务器和数据的包,支持 json 文件存本地被修改,自动生成 resut 风格可操作的接口,有效的 CURD 操作,对数据要求高时,推荐使用
// jsonserver/db.js
// 用 mockjs 模拟生成数据
const Mock = require('mockjs')
let mr = Mock.Random // 提取 mock 的随机对象

module.exports = () =>
  Mock.mock({
    'goods|3': [{
      'id|+1': 100,
      title: '@ctitle(6,10)',
      des: 'csentence(10,20)',
      time: 'integer()',
      detail: {
        auth: '@cname()',
        auth_icon: mr.image('50x50',mr.color(),mr.cword(1))
      }
    }]
  })

// 使用 app.js
module.exports = {
  ...Mock.mock({
    'goods|3': [{
      'id|+1': 100,
      title: '@ctitle(6,10)',
      des: 'csentence(10,20)',
      time: 'integer()',
      detail: {
        auth: '@cname()',
        auth_icon: mr.image('50x50',mr.color(),mr.cword(1))
      }
    }]
  })
}
启动 json-server 服务 json-server ./jsonserver/db.js
// jsonserver/app.js
const jsonServer = require('json-server'); // 在 node 里面使用 json-server 包
const db = require('./db.js'); // 引入 mockjs 配置模块  需要暴露一个对象
const path = require('path');
const Mock = require('mockjs');

let port = 3333; // 端口
let mock = '/mock' // 接口别名

// 创建服务器
const server = jsonServer.create(); // 创建 jsonserver 服务对象  ~~ express()


// 配置 jsonserver 服务器 中间件
server.use(jsonServer.defaults({
  static: path.join(__dirname, '/public'), // 静态资源托管
}));

server.use(jsonServer.bodyParser); // 抓取 body 数据使用 json-server 中间件


// 响应
server.use((request, res, next) => { // 可选 统一修改请求方式
  // console.log(1)
  // request.method = 'GET';
  // 校验token
  next();
});

// 登录注册校验 模拟 db.js 接口 , 多出逻辑
let mr = Mock.Random;//提取mock的随机对象
server.post(mock + '/login', (req, res) => {

  let username = req.body.username;
  let password = req.body.password;
  (username === 'joe' && password === 'qqqqqq') ?
    res.jsonp({ // json-server 返回数据的一个 api 而已
      "err": 0,
      "msg": "登录成功",
      "data": {
        "follow": mr.integer(1, 5),
        "fans": mr.integer(1, 5),
        "nikename": mr.cname(),
        "icon": mr.image('20x20', mr.color(), mr.cword(1)),
        "time": mr.integer(13, 13),
        "token": mr.integer(25)
      }
    }) :
    res.jsonp({
      "err": 1,
      "msg": "登录失败",
    })

});
server.post(mock + '/reg', (req, res) => {

  let username = req.body.username;
  (username !== 'alex') ?
    res.jsonp({
      "err": 0,
      "msg": "注册成功",
      "data": {
        "follow": mr.integer(0, 0),
        "fans": mr.integer(0, 0),
        "nikename": mr.cname(),
        "icon": mr.image('20x20', mr.color(), mr.cword(1)),
        "time": mr.integer(13, 13)
      }
    }) :
    res.jsonp({
      "err": 1,
      "msg": "注册失败",
    })

});

// 响应 mock 接口 自定义返回结构 定义 mock 接口别名

const router = jsonServer.router(db); // 创建路由对象 db 为 mock 接口路由配置  db==object


router.render = (req, res) => { // 自定义返回结构
  let len = Object.keys(res.locals.data).length; // 判断数据是不是空数组和空对象
  // console.log(len);

  setTimeout(() => { // 模拟服务器延时
    res.jsonp({
      err: len !== 0 ? 0 : 1,
      msg: len !== 0 ? '成功' : '失败',
      data: res.locals.data
    })
  }, 1000)

  // res.jsonp(res.locals.data)

};


server.use(jsonServer.rewriter({ // 路由自定义别名
  [mock + "/*"]: "/$1",
  "/course_category\\?uid=:id": "/course_category/:id",
  "/posts/:category": "/posts?category=:category",
  "/articles\\?id=:id": "/posts/:id"

}));

server.use(router); // 路由响应


// 开启 jsonserver 服务
server.listen(port, () => {
  console.log('mock server is running')
});
启动 app.js 文件 node ./jsonserver/app.js
反向代理

工作中前后端是分离式开发,需要访问本地或者线上真实服务器时,跨域也成了每个前端工程师都需要了解的基本知识,解决方案有前端或者后端开发人员来解决
在 UMI3 中配置 config/config 的 proxy 键,接受一个对象,可单独做一个模块到 config/proxy,并暴露出来
export default {
  '/api/': {
    // 要代理的真实服务器地址
    target: 'https://localhost:9001',
    // 配置了这个可以从 http 代理到 https
    https:true
    // 依赖 origin 的功能可能需要这个,比如 cookie
    changeOrigin: true,
    pathRewrite: { '^/api': '' }, // 路径替换
  }
}
fetch 请求
fetch是原生的数据请求方法,返回 promise
const getData = async () => {
    //let res = await fetch('/umi/goods/home?_limit=3');
        let res = await fetch(
    '/umi/login',{
      method:'post',
      headers:{"Content-type":"application/x-www-form-urlencoded"},
      body:'username=alex&password=alex123'
    });
    let data = await res.json();
    console.log(data);
};
umi-request 请求
通过 import { request } from 'umi'; 你可以使用内置的请求方法。第一个参数是 url,第二个参数是请求的 options。options 具体格式参考 umi-request,也和 axios 用法基本一致
const getData = async () => {
  let res = await request('/umi/goods',{params:{_limit:1}})
  // let res = await request('/api/goods/home',{params:{_limit:1}})
  console.log(res)
}
useRequest 请求
useRequest 是最佳实践中内置的一个 Hook ,默认对数据要求必须返回一个 data 字段,如果不希望有此限定,可以构建时配置一下 config/config
request: {
  dataField: '',
},
在组件初次加载时, 自动触发该函数执行。同时 useRequest 会自动管理异步请求的 loading,data,error 等状态。
import {useRequest} from 'umi'

export default function  RequestHooks(){

  // 用法 1
  const { data, error, loading } = useRequest('/umi/goods');

    // 用法 2
  const { data, error, loading } = useRequest({
    url: '/umi/goods',
    params:{_limit:1}
  });

    // 用法 4
  const { data, loading, run } = useRequest((_limit) => ({
    url: '/umi/goods',
    params: { _limit }
  }), {
    manual: true, // 手动通过运行 run 触发
  });

  // 轮询
  const { data, loading, run } = useRequest((_limit) => ({
    url: '/umi/goods',
    params: { _limit }
  }), {
    manual: true, // 手动通过运行 run 触发
    pollingInterval:1000, // 轮询 一秒读一次
    pollingWhenHidden:false, // 屏幕不可见时,暂停轮询
  });

  if (error) {
    return <div>failed to load</div>
  }

  if (loading) {
    return <div>loading...</div>
  }

  return (
    <div>{JSON.stringify(data)}</div>
    <button onClick={()=>run(1)}>手动</button>
  );
}
状态管理
dva 介绍
dva 首先是一个基于 redux 和 redux-saga 的数据流方案,被 umi 以插件的方式内置,无需安装直接使用,在原有 redux 使用基础上更加简化和高效
dva 里面有关状态管理(数据流)的角色和redux的对比如下:
| redux | dva | |
|---|---|---|
| 状态数据 | state | state |
| 行为描述 | action | action |
| 无副作用业务 | reducer | reducer |
| 有副作用业务 | creators | effect |
| 通讯请求修改状态函数 | dispatch | dispatch |
| 通讯请求获取状态函数 | connect | connect |
| 从 源 获取数据 | 无 | subscription |
[^状态数据]: javascript 对象,存公共状态的仓库[^行为描述]: javascript 对象,必须带有type属性指明具体的行为,其它字段可以自定义[^dispatch]: 用于触发 action 的函数[^无副作用业务]: 一个纯函数,处理公共状态时的一些同步业务[^有副作用业务]: 处理公共状态时的一些异步业务
数据流向
数据的改变发生通常是通过用户交互行为或者浏览器行为(如路由跳转等)触发的,当此类行为会改变数据的时候可以通过 dispatch 发起一个 action,如果是同步行为会直接通过 Reducers 改变 State ,如果是异步行为(副作用)会先触发 Effects 然后流向 Reducers 最终改变 State,最后 State 的数据再流回组件页面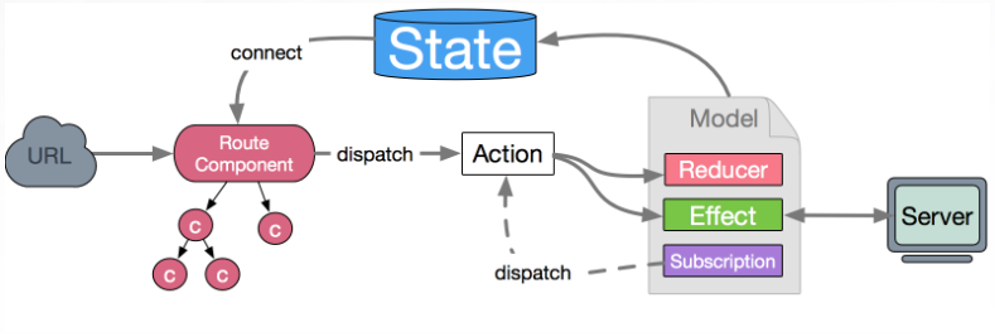
定义一个 dva 的 Model 如下:
export default {
  namespace:'Model名', // 省略不写,认定文件名为 Model 名
  state:{公共状态数据},
  reducers:{一堆纯函数},
  effects:{一堆异步副作用函数},
  subscription:{一堆监听函数}
}
全局数据&页面数据获取和修改
全局数据定义在 src/models/XX,所有页面都可以访问,同步业务的处理交给 reducers
import { history, request } from 'umi';
import key from 'keymaster';

export default {

  namespace: 'global', // 所有 models 里面的 namespace 不能重名

  // 初始化全局数据
  state: {
    title:'全局 title',
    text: '全局 text',
    login: false,
    a:'全局 models aaaa',
  },

  // 处理同步业务  接收 dispatch({type:'global/setText',...
  reducers: {
    setText(state) {
      // copy 更新并返回
      return {
        ...state,
        text: '全局设置 后的 text'+Math.random().toFixed(2),
      };
    },
    setTitle(state,action) { // action 接受到的参数
      return {
        ...state,
        title: `全局设置 后的 title${action.payload.a}/${action.payload.b}`,
      };
    },
    signin:(state)=>({
      ...state,
      login: true,
    }),
  },

};
组件内部获取和修改全局数据
import {connect} from 'umi'

const 组件 = (props) => {
  return (
    <>
      <h3 className="title">获取全局 state  </h3>

      <div>text:{props.text}</div>
      <div>title:{props.title}</div>
      <div>a:{props.A}</div>
      {
        props.isLogin ? <div>已登录</div> : <div>未登录</div>
      }

      <h3 className="title">修改全局 state</h3>
      <button
        onClick={() => {
          props.dispatch({
            type: 'global/setText',
          });
        }}
      >
        修改全局 text,不传参
      </button>

      <button
        onClick={() => {
          props.dispatch({
            type: 'global/setTitle',
            payload:{a:1,b:2}
          });
        }}
      >
        修改全局 text,传参
      </button>
    </>
  );
}

export default connect(state => ({
  // 抓取全局,重命名
  text: state.global.text,
  title: state.global.title,
  A: state.global.a,
  isLogin: state.global.login,
}))(组件);
页面数据获取和修改
页面数据定义在 pages/页面目录/model.js 或者 pages/ 页面目录/models/*.js,当前页面目录只分配一个数据文件时,使用 model.js,当前页面目录分配多个数据文件时,使用 models/*.js
页面目录 /*.jsx 可访问当前页面目录 /model.js 及当前页面目录 /models/*.js,也可向上访问,但子集页面目录和同级页面目录数据不可访问
// pages/*/model.js
export default {
  namespace: 'dva',
  state: 'bmw',
  reducers: {
    setStr(state) {
      return 'qq';
    },
  }
};

// pages/*/models/a.js
export default {
  namespace: 'a',
  state: 'page model a',
};
组件内部获取和修改页面数据
import {connect,getDvaApp} from 'umi'
import Child from './child'

const Dva = (props) => {
  return (
    <>
      <h3 className="title">获取页面 models</h3>
      <p>model.js 里面的数据:{props.dva}</p>
      <p>models 目录里面的的数据:{props.a}</p>
      <p>models 目录里面的的数据:{props.b}</p>
      <hr/>
      <h3 className='title'>修改页面 model 数据</h3>
      <button onClick={()=>props.dispatch({type:'dva/setStr'})}>修改</button>
    </>
  );
}

export default connect(state => ({
  // 抓取页面级别
  dva:state.dva,
  a: state.a,
  b: state.b,
}))(Dva);

// connect 不传参不获取数据,dispatch 默认传给组件
// export default connect()(Dva);
异步处理逻辑
effects处理异步等一些有副作用的逻辑,如下:
import { request } from 'umi';
export default {
  namespace: 'global', // 所有 models 里面的 namespace 不能重名
  state: {
    login: false,
  },
  reducers: { // 处理同步 左 key 接收 dispatch({type:key
    signin:(state,{type,payload})=>({
      ...state,
      login: true, // payload 实际数据决定 login 的值
    }),
  },
  effects: {
    // 接收来自 dispatch({type:'global/login'...
    *login(action, { call, put, select }) {
      const data = yield call(request,'/umi/login',{method:'post',data:{username:action.payload.username,password:action.payload.password}})
      yield put({
        type: 'signin',
        payload:data
      });
    },
  }
};[^put]: 发出一个 Action,给 reducers[^select]: 从 state 里获取数据,如const todos = yield select(state => state.todos)[^yield]: 状态机语法,类似 await,同步书写异步代码[^action]: 可获取发送请求时的类型,携带的负载
export default {
  namespace: 'count', // 命名空间,用于区分不同的模块
  state: 0, // 跨组件共享的数据
  reducers: {
    // 处理同步操作
    increment(state) {
      return state + 1;
    },
    decrement(state) {
      return state - 1;
    },
    incrementStep(state, action) {
      return state + action.payload;
    },
    decrementStep(state, action) {
      return state - action.payload;
    },
  },
  effects: {
    // 处理异步操作
    *incrementAsync(action, { put, call }) {
      yield call(delay, 2000); // 调用异步方法
      yield put({
        // 触发 reducers
        type: 'increment',
      });
    },
    *decrementAsync(action, { put, call }) {
      yield call(delay, 1000);
      yield put({
        type: 'decrement',
      });
    },
  },
};

const delay = (ms) => {
  // 模拟异步请求
  return new Promise((resolve, reject) => {
    setTimeout(() => {
      console.log('delay');
      resolve();
    }, ms);
  });
};
import React from 'react';
import { connect } from 'umi';
import { Button, Space } from 'antd';
function ComponentA(props) {
return (
<div>
ComponentA --- {props.count}
<br />
<Space>
<Button
type="primary"
onClick={() => props.dispatch({ type: 'count/increment' })}
>
+ 1
</Button>
<Button
type="primary"
onClick={() =>
props.dispatch({ type: 'count/incrementStep', payload: 5 })
}
>
+ 5
</Button>
<Button
type="primary"
onClick={() => props.dispatch({ type: 'count/incrementAsync' })}
>
async + 1
</Button>
</Space>
</div>
);
}
const mapStateToProps = (state) => {
return {
count: state.count,
};
};
export default connect(mapStateToProps)(ComponentA);丢弃 connect 高级组件,转投 hooks
import { useDispatch, useSelector } from 'umi';

const 组件 = () => {
  const dispatch = useDispatch();
  const { dva } = useSelector((state) => ({ dva: state.dva }));
  return (
    <>
      <h3 className="title">子组件3</h3>
      <div>{dva}</div>
      <div>
        <button
          onClick={() => {
            dispatch({ type: 'global/setTitle', payload: { a: 11, b: 22 } });
          }}
        >
          修改全局 model
        </button>
      </div>
    </>
  );
};

export default 组件;
subscriptions 源*获取
订阅一个数据 “源” 的变化,使用场景如:服务器的 websocket 连接、keyboard 输入、geolocation 变化、history 路由变化
import key from 'keymaster';

export default {
  namespace: 'global',
  state: {
  },
  subscriptions: {
    listenRoute({ dispatch,history}) {
      history.listen(({ pathname, query }) => {
        console.log('global subscriptions',pathname,query);
      });
    },
    listenKeyboard({dispatch}) { // 监听键盘
      key('⌘+i, ctrl+i', () => { dispatch({type:'setText'}) });
    },
    listenResize({dispatch}) { // 监听窗口变化
      window.onresize = function(){
        console.log('onresize')
      }
    },
    listenScroll({dispatch,history}){
      window.onscroll=function () {
        console.log('onscroll')
      }
    }
  },
};
运行时配置
构建时配置 config/config 能覆盖大量场景,但有一些却是编译时很难触及的。比如:
- 在出错时显示个 message 提示用户
- 在加载和路由切换时显示个 loading
- 页面载入完成时请求后端,根据响应动态修改路由
运行时配置和构建时配置的区别是他跑在浏览器端,基于此,我们可以在这里写函数、jsx、import 浏览器端依赖等等,注意不要引入 node 依赖。
配置方式
约定 src/app.jsx 定义并暴露一些固定名称的函数,他们会在浏览器端择机运行,全局执行一些业务
渲染前的权限校验

render 函数, 用于改写把整个应用 render 到 dom 树里, 覆写 render,接受一个 oldRender 函数,最后用 oldRender 来渲染 dom, 需至少被调用一次
export const render = async (oldRender) => {
  const { isLogin} = await request('/umi/auth');
  if (!isLogin) {
    history.push('/login');
  }
  // oldRender, Function,原始 render 方法,需至少被调用一次
  oldRender();
}
// mock/auth
'GET /umi/auth': (req, res) => {
res.send({
isLogin: true,
});
},动态路由读取、添加
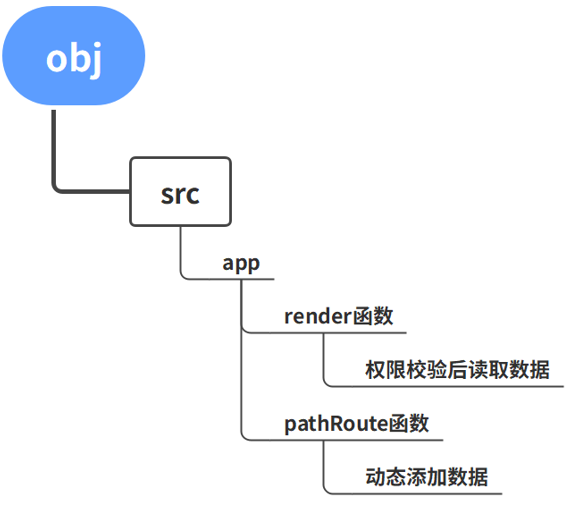
patchRoutes 函数提供了在运行时,动态修改路由的入口,一般可以和 render 函数配合, 请求服务端根据响应动态更新路由
export function patchRoutes({ routes }) {
    // routes 为当前路由
  routes.unshift({
    path: '/foo',
    exact: true,
    component: require('@/pages/foo').default,
  });
}
需要注意的地方是:
- 动态路由的 compnent 要的是一个组件不是一段地址,可通过 require 引入
- 动态路由读取后,跳转后不显示,需要关闭
mfsu: {} - 子路由不跳转,除了 layout 组件,其他需要添加 exact,构建时的配置在编译后都会自动加,而动态路由如果路由数据没有 exact 会导致不跳转
- 数据数据里面不可以有 require,数据需要过滤,require(非空字符拼接+变量)
- document.ejs 报错,需要 require 拼接时找到 index.jsx 目前 umi3 有这个问题
模拟路由数据
// mock/auth

'GET /umi/menus': (req, res) => {
    res.send([
      {
        path: '/',
        component: 'layouts/layout1',
        routes: [
          {
            title: '资源引入',
            path: '/resources',
            component: 'pages/css-img',
          },
          { path: '/less', component: 'pages/less' },
          {
            path: '/goods',
            component: 'layouts/layout2',
            routes: [
              { path: '/goods/:id?', component: 'pages/goods/goods-detail' },
              {
                path: '/goods/:id/comment',
                component: 'pages/goods/comment',
              },
              {
                path: '/goods/:id/comment/:cid',
                component: 'pages/goods/comment/comment-detail',
              },
              { component: 'pages/404' },
            ],
          },
          { path: '/data-interaction', component: 'pages/data-interaction' },
          { path: '/dva', component: 'pages/dva' },
          { path: '/antd', component: 'pages/antd' },
          { path: '/hooks', component: 'pages/hooks' },
          {
            path: '/user',
            component: 'pages/user',
            wrappers: ['wrappers/auth'],
          },

          { path: '/', redirect: '/antd' },
          { component: 'pages/404' },
        ],
      },
      { component: 'pages/404' },
    ]);
  },
读取路由数据并添加路由
// src/app

let routesData = []; // 模块变量用来存储路由数据

// render 函数里面读取路由数据
export const render = async (oldRender) => {
  const { isLogin } = await http('/umi/auth');
  if (isLogin) {
    // 获取路由数据
    routesData = await http('/umi/menus');
  } else {
    history.push('/login');
  }
  oldRender();
};

export function patchRoutes({ routes }) {
  filterRoutes(routesData); // 处理数据,添加 exact,指定 index.js,拼接 require
  routesData.map((item) => routes.push(item)); // 动态添加路由
}

const filterRoutes = (routesData) => {
  routesData.map((item) => {

    // exact 处理
    if (item.routes && item.routes.length > 0) {
      filterRoutes(item.routes); // 含 routes 键的需要递归处理
    } else {
      item.exact = true; // 不含 routes 键的都添加 exact
    }

    // component 地址拼接处理
    if (!item.redirect) { // 不处理带有 redirect 字段
      if (item.component.includes('404')) { // 404 没有 index 文件结构
        item.component = require('@/' + item.component + '.jsx').default;
      } else {
        // 其他页面都指向 index 结构,避免 umi3 的 document.ejs 报错
        item.component = require('@/' + item.component + '/index.jsx').default;
      }
         // 部分需要授权路由的拼接
      if (item.wrappers && item.wrappers.length > 0) {
        item.wrappers.map((str, index) => {
          item.wrappers[index] = require('@/' + str + '.jsx').default;
        });
      }
    }
  });
};
// 动态路由地址要 require 引入
// require(需要字符拼接+变量)
// document.ejs报错,需要找到index.jsx
const filterRoutes = (routesData) => {
routesData.map((item) => {
if (item.routes && item.routes.length > 0) {
filterRoutes(item.routes);
} else {
item.exact = true;
}
if (!item.redirect) {
if (item.component.includes('404')) {
item.component = require('@/' + item.component + '.jsx').default;
} else {
item.component = require('@/' + item.component + '/index.jsx').default;
}
if (item.wrappers && item.wrappers.length > 0) {
item.wrappers.map((str, index) => {
item.wrappers[index] = require('@/' + str + '.jsx').default;
});
}
}
});
};
export { filterRoutes };import { request as http, history } from 'umi';
import { filterRoutes } from './utils/filterRoutes';
let routesData = [];
export function patchRoutes ({ routes }) {
// 动态添加路由
console.log('pathroutes', routes);
/* routes.push({
path: '/',
component: require('@/layouts/layout1').default,
routes: [
{
exact: true,
title: '资源引入',
path: '/resources',
component: require('@/pages/css-img').default,
},
{
exact: true,
path: '/less',
component: require('@/pages/less').default,
},
{
path: '/goods',
component: require('@/layouts/layout2').default, //展示区
routes: [
{
exact: true,
path: '/goods/:id?',
component: require('@/pages/goods/goods-detail').default,
},
{
exact: true,
path: '/goods/:id/comment',
component: require('@/pages/goods/comment').default,
},
{
exact: true,
path: '/goods/:id/comment/:cid',
component: require('@/pages/goods/comment/comment-detail').default,
},
{ exact: true, component: require('@/pages/404').default },
],
},
{
exact: true,
path: '/data-interaction',
component: require('@/pages/data-interaction').default,
},
{
exact: true,
path: '/dva',
component: require('@/pages/dva').default,
},
{
exact: true,
path: '/antd',
component: require('@/pages/antd').default,
},
{
exact: true,
path: '/hooks',
component: require('@/pages/hooks').default,
},
{
exact: true,
path: '/user',
component: 'user',
wrappers: [require('@/wrappers/auth').default],
}, // 路由守卫
{ exact: true, path: '/', redirect: '/antd' },
{ exact: true, component: require('@/pages/404').default },
],
});
routes.push({ exact: true, component: require('@/pages/404').default }); */
filterRoutes(routesData);
routesData.map((item) => routes.push(item));
console.log('patchRoutes', routes);
}
export const render = async (oldRender) => {
//只运行首次
/* console.log(
'render 渲染之前做一些权限校验,读取路由数据,在patchRoutes之前运行,',
); */
const { isLogin } = await http('/umi/auth');
if (isLogin) {
// 获取路由数据
routesData = await http('/umi/menus');
// console.log(111, routesData);
} else {
history.push('/login');
}
// oldRender, Function,原始 render 方法,需至少被调用一次
oldRender();
/* fetch('/api/auth').then(auth => {
if (auth.isLogin) { 获取路由数据 let routesData = auth.routes;oldRender() }
else { history.push('/login'); }
}); */
};
export function onRouteChange ({ matchedRoutes, location, routes, action }) {
console.log('routes', routes); // 路由集合
console.log('matchedRoutes', matchedRoutes); // 当前匹配的路由及其子路由
console.log('location', location); // location及其参数
console.log('action', action); // 当前跳转执行的操作
// console.log('初始加载和路由切换时的逻辑')
// 初始加载和路由切换时的逻辑,用于路由监听, action 是路由切换方式如:push
// 用于做埋点统计
// 动态设置标题
document.title =
matchedRoutes[matchedRoutes.length - 1].route.title || 'heheda';
}
export const request = {
// timeout: 1000,
// errorConfig: {},
// middlewares: [],
requestInterceptors: [
(url, options) => {
// 请求地址 配置项
options.headers = {
token:
'eyJhbGciOiJIUzI1NiIsInR5cCI6IkpXVCJ9.eyJ1c2VybmFtZSI6ImFsZXgiLCJfaWQiOiI1ZThhMGQ2MzczNDg2MDIzYTRmZDY4ZGYiLCJpYXQiOjE1ODkxMDQ4NjcsImV4cCI6MTU4OTE5MTI2N30.e0GWBDhYILXOuCpoCXq75T4PeBiNFgSab54sMe6yTk4',
};
// console.log('请求地址 配置项');
return { url, options };
},
],
responseInterceptors: [
(response, options) => {
// 响应体 请求时的配置项
// console.log('响应体 请求时的配置项');
return response;
},
],
};路由监听,埋点统计
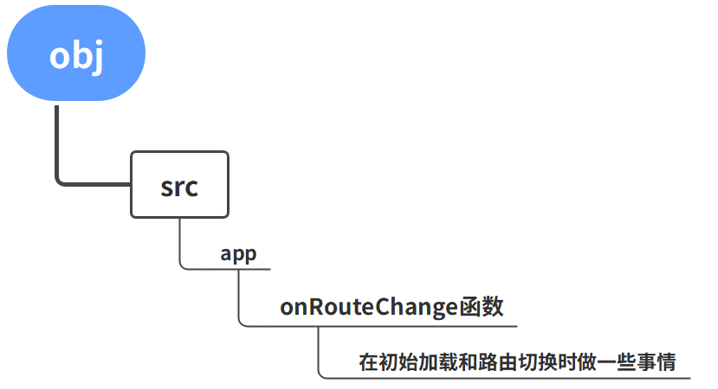
onRouteChange 函数内部可以设置,在初始加载和路由切换时做一些事情,比如埋点,设置动态标题等操作
export function onRouteChange({ matchedRoutes, location, routes, action }) {
  // 动态设置标题
  document.title = matchedRoutes[matchedRoutes.length - 1].route.title || '默认标题'
}[^location]: history 提供的 location 对象[^routes]: 路由集合[^action]: PUSH|POP|REPLACE|undefined,初次加载时为 undefined
export function onRouteChange({ matchedRoutes, location, routes, action }) {
  console.log('routes', routes) // 路由集合
  console.log('matchedRoutes', matchedRoutes) // 当前匹配的路由及其子路由
  console.log('location', location) // location 及其参数
  console.log('action', action) // 当前跳转执行的操作

  // 动态设置标题
  document.title = matchedRoutes[matchedRoutes.length - 1].route.title || '默认标题'
}
拦截器
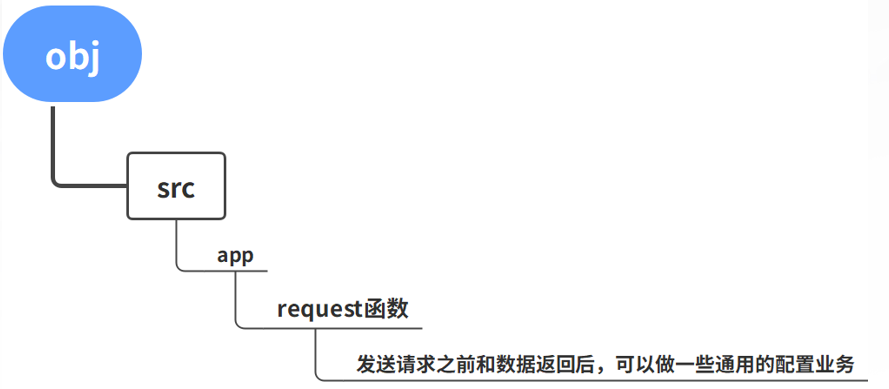
umi 内置的 request 和 useRequest 在发送请求之前和数据返回后,可以做一些通用的配置业务,这个时候考虑配置拦截器,参考插件配置
export const request = {
  requestInterceptors: [
    (url, options) => {
      // 请求地址 配置项
      options.headers = {
        token:'..',
      };
      return { url, options };
    },
  ],
  responseInterceptors: [],
};
// src/app.js
export const request = {
// timeout: 1000, // 延时
// errorConfig: {}, // 错误处理
// middlewares: [], // 使用中间件
requestInterceptors: [ // 请求拦截器,数组里面是函数
// 参数是请求地址和配置项
(url, options) => {
options.headers = {token: 'xxx'}
return {url, options}
}
],
responseInterceptors: [ // 响应拦截器
// 参数是响应体和请求时配置项
(response, options) => {
return response
}
]
}umi3 一般适合开发一些 h5 端的各类 web 应用,如果考虑开发中台管理系统,可以去看看蚂蚁系提供的 antd-pro 框架
